How to Line a Pickleball Court: A Comprehensive Guide

Pickleball has surged in popularity over recent years, bringing players of all ages together for friendly competition and exercise. Whether you’re setting up a court for a neighborhood gathering or establishing a permanent facility, lining a pickleball court is a vital step to ensure that the games are played according to regulations. A well-marked court not only enhances the aesthetic appeal but also promotes fair play by clearly defining boundaries. In this comprehensive guide, we will walk you through every aspect of how to line a pickleball court, from the tools and materials you’ll need to detailed step-by-step instructions for marking every line with precision. So, grab your measuring tape, your favorite color of paint, and let’s dive into how to bring your pickleball court to life!

how-to-line-a-pickleball-court

Tools and materials needed

To achieve a correctly lined pickleball court, it’s essential to gather the appropriate tools and materials. Imagine embarking on a painting project with a blank canvas; without the right instruments, your masterpiece might not turn out as desired. The same principle applies to lining a pickleball court. Here’s a list of tools and materials you’ll need:

Tools:

  • Tape Measure: Essential for measuring lengths and widths accurately.
  • Chalk Line or String Line: Used to create straight lines for the court boundaries and service areas.
  • Level: Ensures that the playing surface is even.
  • Roller or Paint Sprayer: For applying surface materials.

Materials:

  • Court Surface Material: Acrylic surfaces like PicklePave or AcrylotexPB are recommended for outdoor courts due to their slip-resistant properties.
  • Line Paint: A durable, weather-resistant paint, typically 2 inches wide, used for marking court lines; it’s crucial that the color contrasts well with the court surface.
  • Net and Posts: The net should be 20 feet long, 36 inches high at the sides, and 34 inches at the center.

Preparing with these tools and materials will serve as the foundation for your court’s success. A well-assembled toolkit ensures that no step of the process is hindered by a lack of resources. Think of it like gathering a toolbox before embarking on a thrilling adventure; every tool has a purpose that contributes to the overall goal.

Standard dimensions of a pickleball court

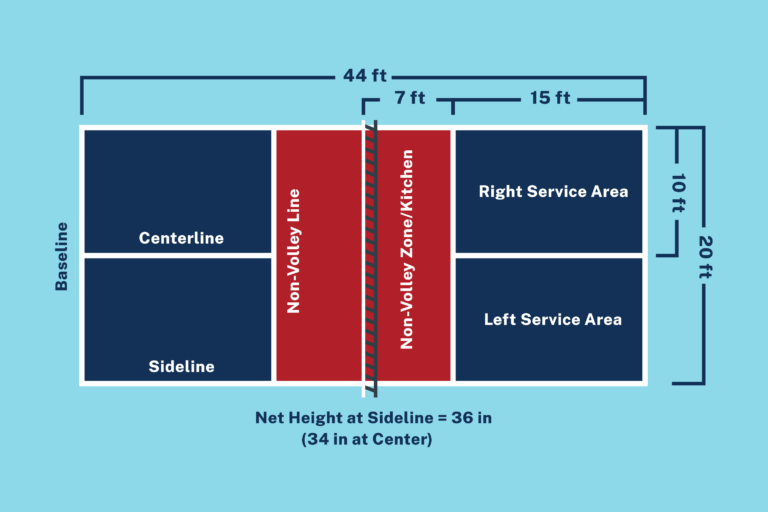
Understanding the standard dimensions of a pickleball court is crucial for proper line marking. A pickleball court measures 20 feet wide by 44 feet long (6.10 m x 13.41 m). This area is specifically designed to accommodate both singles and doubles play. Furthermore, the minimum recommended playing area for safety and movement is 30 feet wide by 60 feet long (9.14 m x 18.29 m).

Standard dimensions of a pickleball court

Key areas of the court:

  1. Non-Volley Zone (Kitchen): This area is located 7 feet from the net on both sides, where players cannot volley the ball.
  2. Service Areas: Each service area measures 10 feet by 15 feet behind the non-volley line on each side of the court.

These dimensions are not arbitrary; they reflect the strategic elements of pickleball play. Just as chess pieces occupy specific squares on a board, each zone in a pickleball court serves a distinct tactical purpose that influences gameplay. Paying heed to these dimensions ensures a fair playing field, preventing unnecessary disputes and miscommunications during a match.

Step-by-step guide to marking the court lines

Marking the lines of a pickleball court accurately can be likened to stringing a guitar a single misplaced note can disrupt the entire melody. Below is a detailed step-by-step guide for marking the court lines effectively:

Step-by-step guide to marking the court lines
  1. Gather Your Materials: Ensure you have a measuring tape, chalk or masking tape, a straight edge (like string or rope), a level, and possibly stakes.
  2. Measure the Court Dimensions: The standard dimensions for a pickleball court are 20 feet wide and 44 feet long. Start by measuring out the length and confirming it’s accurate.
  3. Mark the Centerline: Find the center of the 44-foot length and mark a point at 22 feet. Connect this center point to both baselines, creating the centerline that divides the court into equal halves.
  4. Mark the Baselines: Measure from the centerline 22 feet towards each end, marking where the baselines will be on the outer edges. Use a straight edge to connect these marks visually.
  5. Mark the Sidelines: From each baseline, measure out 20 feet on both sides to mark the sidelines. Use the straight edge to connect these marks, forming the outer sides of the court.
  6. Mark the Non-Volley Zone: Measure 7 feet from the net on either side and mark this point. Draw a line parallel to the net, creating the boundaries of the non-volley zone.
  7. Double-Check Your Measurements: Stand back and scrutinize the lines for width and straightness. The act of stepping back to observe can reveal if your lines are straight and proportional.

By following these steps, you can create a meticulously marked pickleball court that offers an inviting environment for players. Just like mastering a recipe, adhering to these directions ensures you’ll get consistent results, allowing everyone on the court to focus on enjoying the game.

Measuring and marking the court’s perimeter

When it comes to accurately measuring and marking the perimeter of the pickleball court, it’s essential to focus on precision the kind of meticulousness that ensures everything aligns harmoniously.

To begin, gather your materials: a measuring tape, chalk for marking, a long string or rope, and stakes to secure corners. It’s akin to preparing for a hike without the right gear, the journey can become complicated and frustrating.

Start by measuring out the standard dimensions. The pickleball court should span 20 feet in width and 44 feet in length. Consider breaking this down first, measure the length. Walk 44 feet with your measuring tape, making a mark on the ground. Next, return to the ends to measure out the width. Check from one side to the other 20 feet on both sides, visually confirming the straightness of the lines.

Utilize a straight edge to snap a chalk line. This step can be likened to following a line on a map it reveals where one should travel. Ensure that your chalk line is taut and straight, guiding your subsequent markings. It’s not just about getting there; it’s about creating a clear path for others to follow.

Lastly, don’t forget to step back and review your work from several angles. Just as a sculptor steps back to observe their creation, inspect the perimeter of the court for accuracy. By taking the time to validate your measurements and marking procedures, you’ll set the stage for exciting games to come.

Creating the centerline

The centerline is a crucial element that divides the court into two halves, shaping the dynamics of the game. Let’s explore how to mark this vital line effectively.

  1. Begin by Measuring: Take your tape measure and find the midpoint of the court’s length, which is 22 feet from either baseline.
  2. Mark This Midpoint: Use chalk to lightly mark this point, ensuring it is visible but easily removable if adjustment is needed.
  3. Create the Line: With the midpoint established, use a straight edge to extend this line to both baselines. This is akin to drawing a road map one clear path leading to your destinations.
  4. Confirm Straightness: Using a level, examine the alignment of your centerline. It’s essential for facilitating standard gameplay; a crooked line can skew player positioning and serve strategies.
  5. Finalize the Marking: Once you’re satisfied with its placement, trace over your chalk mark with paint or lay it down with tape.

When done correctly, the centerline serves not only as a divider but as a vital navigation point for service rotations during play. Much like a guiding star for sailors, this line helps players orient their strategies and movements effectively throughout matches.

Establishing the baselines

Baselines play a pivotal role in the game’s dynamics, serving as the rear boundary of the court where players position themselves to return serves. Here are the steps to establish these important lines:

  1. Determine the Placement: Begin by identifying the distance from the net to the baseline. The back boundary must be 22 feet from the net, creating an adequate space for effective serves and returns.
  2. Measure Out: Using your tape measure, make two marks on the court, 22 feet from the nets on both ends. This step will create your points for the endpoints of the baselines.
  3. Draw the Lines: With straight edges or a chalk line, connect the marks made on both sides to create the baseline. It’s essential to ensure that these lines stretch across the full width of the court, running parallel to the net.
  4. Double-Check Your Work: Stand at the midpoint of the court and visually confirm that the baselines are straight and parallel; they should mirror the centerline and each other.
  5. Secure the Markings: Once satisfied, solidify your baselines with paint or tape, maintaining the 2-inch width that is standard for pickleball courts.

Establishing the baselines correctly sets the stage for fair play, allowing players to understand the boundaries clearly. It’s like laying down the rules in a conversation when everyone knows where they stand, dialogues flow smoothly, and gameplay becomes seamless.

Marking the sidelines

Sidelines are essential for defining the outer boundaries of the court. Clear markings ensure that players are aware of the limits while engaging in fast-paced action. Here’s how to establish the sidelines effectively:

  1. Measure Side to Side: Start from the baselines and measure outwards 20 feet on both ends of the court. These measurements are crucial as they establish the width of the court.
  2. Mark the Endpoints: Using chalk or markers, create points for where the sidelines will be located. You can think of this as placing flags on a marathon route each one signifies a point a runner must remember.
  3. Connect the Points: With a straightedge or chalk line, draw a straight line between the marked points to establish the sidelines. Ensure that they run parallel to the baselines.
  4. Use a Level for Accuracy: As any good carpenter knows, being level is the key to success. Use a level to confirm the straightness and evenness of your lines.
  5. Finalize with Paint or Tape: Once everything looks visually and structurally sound, add paint or tape to create a clear boundary that indicates the playing area.

Marking your sidelines accurately creates an environment free of ambiguity, allowing players to focus on their performance instead of confusing boundaries. It’s like familiarizing a traveler with a map the clearer the directions, the smoother the journey to their destination.

Defining the non-volley zone

The non-volley zone, often referred to as “the kitchen,” is an essential area within the pickleball court. Understanding how to mark this zone is crucial, as it significantly impacts the game’s strategy. Follow these steps to define this crucial area:

  1. Determine the Distance from the Net: The non-volley zone should extend 7 feet from the net on both sides. This distance ensures that both players are given an equal opportunity to move.
  2. Mark the Location: Use a measuring tape to measure 7 feet from the net towards each baseline. Mark these distances lightly with chalk or markers.
  3. Connect the Markings: Using a straight edge or chalk line, draw parallel lines from sideline to sideline at the 7-foot marks you’ve established. This effectively creates a distinct boundary for the non-volley zone.
  4. Visual Confirmation: Step back and ensure the lines are straight and evenly spaced. Remember, this zone is not just about boundaries; it dictates how players must approach shots made in this area.
  5. Finalizing the Marks: Paint or apply tape to the lines once you are satisfied with their placement, maintaining clarity and prominence.

Defining the non-volley zone is akin to establishing a safe space where players must adhere to specific rules a measured boundary that encourages tactical play while ensuring safety during fast-paced volleys.

Adding service court lines

Adding service court lines is vital for dictating how each serve should be executed. Here’s a detailed method for marking these lines correctly:

  1. Identify Service Court Dimensions: Each service area extends 10 feet from the centerline towards the sideline and runs 15 feet long towards the net. This means each service area will occupy a space directly behind the non-volley zone.
  2. Mark Service Court Outlines: Measure 10 feet from the centerline on either side and mark these points. Then, from each baseline, measure in 15 feet and mark those endpoints.
  3. Connect The Flanks: Using a straightedge, connect the two marks over the length of 10 feet for both respective sides, forming two separate service areas. This is similar to organizing lanes on a highway a clear guide allows for orderly flow and prevents confusion.
  4. Finalizing the Service Lines: Treat these service area lines carefully by painting or using high-quality tape, ensuring that they stand out from other lines without any overlapping.
  5. Visual Check: Lastly, do a comprehensive check of all the lines. Make sure they are clear and easy to distinguish, considering that they play an immense role in gameplay.

These service court lines, much like traffic lights in a busy city, guideline players on when and where to make their moves. When players know the boundaries, they can focus on their skills and strategies instead of worrying about whether they are in or out of bounds.

Methods for lining the court

When it comes to lining a pickleball court, two primary methods commonly used are utilizing paint for permanent lines and applying tape for temporary lines. Both methods have their unique advantages and applications, depending on whether you seek a long-term solution or a more flexible arrangement.

Methods for lining the court

Using paint for permanent lines

  1. Choose Paint Carefully: Opt for high-quality, weather-resistant paint specifically designed for outdoor sports surfaces. This kind of paint will endure wear and exposure, much like a robust shield defending against the elements.
  2. Preparation is Key: Just as you would prepare your canvas before painting, clean the surface thoroughly to remove dirt and debris, ensuring that paint adheres effectively.
  3. Mark Out the Dimensions: Before applying any paint, use your measuring tape to set the court’s boundaries, creating a precise outline that guides your application.
  4. Application: Use a roller or paint sprayer to cover large areas quickly. Employ a brush for detailed work along the line edges. Apply multiple thin coats for a consistent finish; a thick coat could bubble and peel over time.
  5. Curate a Smooth Finish: After application, check the lines for any imperfections, and make corrections as necessary. A perfect line is a beautiful sight and enhances gameplay.

Applying tape for temporary lines

  1. Selecting Tape: Use high-quality gaffer or court-marking tape, designed for outdoor use and crafted to withstand the elements without lifting or curling.
  2. Surface Preparation: Just like with paint, the surface should be clean and dry before tape application. Removing dirt and moisture ensures that the tape sticks better and lasts longer.
  3. Measuring and Taping: Measure accurately and apply the tape smoothly along the desired lines. Be attentive to avoid bubbles, just as you would be careful when wrapping a delicate gift.
  4. Inspecting Corners and Intersections: Pay attention to corners, as they can be particularly tricky. Cut and place smaller pieces of tape to maintain straight edges wherever necessary.
  5. Regular Maintenance: Temporary tape lines may wear out more quickly than painted lines. Check regularly for any lifting edges or signs of degradation, and replace as needed.

Both methods provide viable options based on your specific needs. Paint offers a permanent solution while tape allows for flexibility, making it easier to repurpose the court for different sports or activities.

Maintaining straight lines with a guide

One of the most critical aspects of lining a pickleball court is ensuring that the lines are straight. Straight lines transform a court from merely functional to impressive and professional. Here’s a detailed method for maintaining straight lines while marking the court:

Maintaining straight lines with a guide
  1. Gather Necessary Tools: Ensure you have a measuring tape, chalk or masking tape, a long straight edge (like a rope), and any necessary paint or tape for marking the court lines.
  2. Measure the Court Dimensions: Begin by measuring the lengths and widths according to official dimensions. Confirm the dimensions are aligned before commencing.
  3. Using a Level and String: Utilize a level and long piece of string. Tie the string from one end of the court to the other to create a guide for your lines. This method functions as a compass guiding you toward straight and level lines.
  4. Mark the Lines: Initially mark each line lightly with chalk, following the guide established by the string. This first pass serves as a trial run a chance to assess whether everything will fit as intended.
  5. Use Tape or Paint for Permanence: After satisfying yourself that everything is lined up correctly, go over the lines with your chosen method using consistent width, typically 2 inches wide.

By creating straight lines, you foster clarity and confidence during games, ensuring players can rely on the defined boundaries. Just like a well-planned city grid, straight lines promote order and make for a more enjoyable experience.

Tips for achieving professional-quality results

To achieve professional-quality results when lining a pickleball court, consider a few critical techniques that elevate the overall appearance and functionality. Here are some concise tips that ensure success:

  1. Plan and Prepare Thoroughly: Before starting, take ample time to plan your court layout and prepare your materials. Skipping preparation can lead to problems later on.
  2. Consistency in Width: Maintain a uniform width of the lines typically 2 inches wide. Consistency creates a clean, professional look that resonates with players.
  3. Use High-Quality Materials: From paint to tape, ensure you are investing in top-tier products designed for sport court lines. Quality materials uphold the integrity of your court across various weather conditions.
  4. Allow Adequate Drying Time: Each layer of paint should have sufficient drying time before adding additional coats. This prevents smudging and guarantees crisp lines.
  5. Visual Inspection: Periodically step back to review your lines as you work. This method allows you to catch any inaccuracies or imperfections early in the process.

By implementing these tips, you can transform your pickleball court into a stunning venue that captures the essence of competitive play and invites players of all skill levels to engage.

Precise measurement techniques

Using precise measurement techniques is essential for creating an effective and professionally lined pickleball court. Accurate measurements not only maximize the efficiency of your setup but also significantly contribute to your gameplay experience.

Precise measurement techniques
  1. Essential Tools: Start by assembling your toolkit: a measurement tape, chalk for marking, a level, and a straight edge. Having reliable tools helps minimize errors and ensure precision in your measurements.
  2. Court Dimensions: Maintain an accurate understanding of the standard dimensions of a pickleball court 20 feet wide and 44 feet long. These specifications serve as your foundation, ensuring consistently fair gameplay.
  3. Establishing Key Points: When measuring, make markings at important points like the midcourt for the centerline, the non-volley zones, and the baselines. This process ensures that every element aligns with regulation standards.
  4. Using Reference Points: Utilize fixed reference points throughout your measurements. Using re-marked areas as reference points helps you gauge whether you are building towards the overall goal of precision.
  5. Verification Process: Repeat measurements when in doubt. It’s better to double-check than to assume accuracy. A small miscalculation could lead to significant variances that affect gameplay.

Employing these precise measurement techniques provides the foundation for a well-structured court. Just as with crafting a fine watch, every tiny detail matters towards the overall success of the operation.

Proper surface preparation

Proper surface preparation is an essential foundational step in lining a pickleball court. Skipping this important phase is akin to trying to paint on a fresh canvas without ensuring it’s clean; the outcome will not be satisfactory. Here are steps to follow for effective surface preparation:

Proper surface preparation
  1. Cleaning the Surface: Begin by thoroughly cleaning the court to ensure that dirt, leaves, and other debris are removed. A clean surface will allow paint and other materials to adhere effectively, creating lasting lines.
  2. Repairs and Leveling: Ensure the surface is free from cracks or uneven patches. Filling cracks or smoothing out rough areas before marking is essential much like preparing a patch of soil before planting a garden.
  3. Dry Conditions: Check that the surface is dry before proceeding. Water or moisture can lead to paint peeling or tape losing its adhesive properties over time.
  4. Choosing the Right Materials: Select high-quality materials suitable for your specific court surface, whether it’s concrete, asphalt, or another type. Different surfaces may require distinct approaches to ensure longevity.
  5. Prime if Necessary: For certain surfaces, especially when transitioning from existing paint to new lines, applying a primer can enhance adhesion and produce a more vibrant color.

By taking the time to prepare the surface correctly, you set the stage for success. A well-prepared foundation strengthens every subsequent step, leading to a court that looks as good as it plays.

Selecting the right paint for your pickleball court ensures that the lines remain visible and withstand aesthetic wear over time. Here’s a detailed look at recommending paint types that provide long-lasting quality:

  1. Acrylic Sport Court Paint: This type of paint is specially formulated for outdoor sports surfaces and provides excellent durability, weather resistance, and color vibrancy. It’s like armor for your court lines, protecting them from the elements.
  2. Color Contrast: For aesthetics and functionality, choose a color that stands out against the surface material. High-contrast colors enhance visibility, allowing players to easily identify boundaries even in varied lighting conditions.
  3. Non-Skid Additives: Adding non-slip additives to the paint can improve traction, helping maintain safety during wet conditions. Safety isn’t just an option; it’s a necessity on a pickleball court where swift movements are common.
  4. Multiple Coats: Applying several thin coats of paint rather than a single thick coat improves durability and adherence. Thin coats also help achieve a more vibrant finish and prevent unsightly bubbling.
  5. Manufacturer Instructions: Always follow the paint manufacturer’s instructions regarding application, drying times, and necessary surface preparation. Neglecting these guidelines can result in disheartening outcomes.

By selecting the appropriate paint types and quality, you can achieve lines that not only enhance gameplay but also uphold the beauty of the court for years to come.

Utilizing high-quality tape

Using high-quality tape for temporary lines on a pickleball court can be a smart and flexible option, especially if the court serves various purposes. Here’s how to ensure effective tape application:

  1. Choosing the Right Tape: Invest in durable painter’s tape or specialized court-marking tape that adheres well to outdoor surfaces. Quality is paramount, as inferior tape may lift or wear out quickly.
  2. Surface Preparation: As with paint, make sure the surface is clean and dry. Dust, dirt, or moisture can hinder tape adhesion, leading to frustrating maintenance issues.
  3. Measuring and Applying: Measure carefully to align with official court dimensions while applying tape smoothly along the designated lines. Pay special attention to maintaining straightness, as crooked lines can disrupt gameplay clarity.
  4. Secure Edges: Press down the tape’s edges firmly to prevent lifting. You might even use a roller or your hand to ensure it sticks well. Think of it as closing tightly a gift box; you want to ensure that it stays secure and intact.
  5. Frequent Inspections: Temporary lines may wear out more quickly than painted ones, so check regularly for any lifting or damage. Replace tape as necessary to maintain high visibility and clear delineation.

High-quality tape allows you to adapt lines without permanent alterations, providing flexibility for various uses. Just as a temporary road sign directs traffic, high-quality tape directs gameplay while still offering the option to repurpose the court.

Maintenance of pickleball court lines

Maintaining the lines on a pickleball court is vital for ensuring a fair and enjoyable playing experience. Consistent upkeep prevents lines from becoming faded or obscured. Here’s a detailed approach to maintaining those lines:

  1. Regular Cleaning: Keep the court lines visible by routinely cleaning them. Use a gentle cleaning solution and a soft brush to remove grime or algae that may accumulate, similar to how one tends to a garden by removing weeds.
  2. Visibility Checks: Frequently assess the visibility of the lines. If they appear faded or worn, prioritize repainting to maintain clarity.
  3. Repainting Techniques: Start by cleaning the area before applying new paint. This preparation ensures the new coat adheres well. Utilize high-quality paint for sports courts and follow the manufacturer’s guidelines.
  4. Storage of Equipment: Protect paint supplies and tools from harsh weather conditions. Proper storage prolongs their usability, just as good care can extend the lifespan of sports gear.
  5. Enhancing Line Widths: For damaged areas or thin spots, use a small brush to touch up and maintain the standard 2-inch width, ensuring the lines remain fully visible.

By integrating these maintenance strategies, you can preserve the longevity and clarity of the court lines. Regular inspections and actions will keep the court looking polished while ensuring that the game is as fun and fair as possible.

Common mistakes to avoid

When linings courts, individuals can easily fall into a few common pitfalls. Here are mistakes to avoid to ensure success in your pickleball court lining:

  1. Incorrect Measurements: Ensure accurate measurements for all court dimensions. A common mistake is neglecting proper distance checks, leading to courts that do not conform to official guidelines.
  2. Poor-Quality Materials: Avoid using low-grade paint or tape, as they do not provide the needed durability. Make it a priority to choose high-quality products destined for sports courts.
  3. Ignoring Surface Condition: Failing to inspect the court surface can lead to uneven lines and ineffective usage of materials. Always check for any damage or issues that need repairing.
  4. Overlooking Line Thickness: Ensure lines consistently measure the required 2-inch width. Thin or uneven lines can create confusion during play.
  5. Misalignment of Lines: Neglecting to confirm straightness can result in crooked lines. Regularly use guides such as string or straightedges to ensure proper alignment.

By proactively avoiding these common mistakes, you create a visually appealing and functionally sound playing area that resonates with players. Just as a skilled navigator avoids rocky shores, a careful approach to court lining will ensure a smooth sailing gameplay experience.

Incorrect measurements

Accurate measurements are fundamental to lining a pickleball court successfully. Miscalculations can not only lead to a poorly dimensioned court but also create conflicts during gameplay. Let’s explore common issues related to incorrect measurements:

  1. Insufficient Space Around the Court: Failing to allow enough clearance around the court can lead to collisions, limiting players’ movement and reducing overall enjoyment.
  2. Measuring Variances: Small inaccuracies in court dimensions like a slight deviation from 20 feet wide by 44 feet long can create significant discrepancies during play. Just like in chess, where each piece’s movement is precise, the dimensions in pickleball profoundly impact gameplay.
  3. Ignoring the Non-Volley Zone: The non-volley zone is crucial for officiating play. Incorrectly marking this area can lead to confusion about allowable shots and misconduct, causing debates over whether points are won or lost.
  4. Failure to Measure from Fixed Points: Remember to measure from known points like the net or existing permanent lines. Starting from arbitrary points can create misalignments within the larger court picture.
  5. Lack of Verification: Not verifying measurements with a second individual can lead to errors. A fresh set of eyes can often catch mistakes before they become problematic.

Ensuring that measurements are precise and reliable sets the entire foundation for gameplay. Similar to how a conductor ensures each instrument is correctly tuned before a performance, accuracy in measurement leads to harmonious gameplay.

Poor quality materials

Opting for poor-quality materials when lining a pickleball court can lead to numerous long-term detriments, from aesthetic issues to safety concerns. Here’s an examination of the risks connected to using subpar materials:

  1. Surface Deterioration: Low-quality paint may wear off quickly, leaving the lines faded and unclear. Regular retouching becomes a burden and detracts from the court’s overall appearance.
  2. Adhesive Failures: Using inferior tape can lead to lifting or curling at the edges, which creates tripping hazards during gameplay. For sports, stickiness isn’t just convenient; it’s crucial for safety.
  3. Ineffective Line Widths: Thinner materials can break down under stress, leading to inconsistent line widths. These fluctuation risks can lead to confusion during play, reducing the quality of competition.
  4. Weather Vulnerability: Materials that are not weather-resistant can suffer when exposed to the elements, causing premature deterioration. Choosing high-quality products is akin to investing in durable sports gear that withstands rigorous play.
  5. Reduced Safety: Using low-grade court materials compromises the integrity of the court, leading to dangerous conditions. Always prioritize quality to ensure long-term safety for players.

Combining quality materials with thorough preparation and maintenance can completely transform the playing experience. Think of it in crafting a fine piece of art every aspect must be worthy for the end product to shine.

Failure to check line alignment

Maintaining proper line alignment is critical for an organized and visually appealing pickleball court. Here are common pitfalls associated with neglecting this important task:

  1. Using Incorrect Tools: Employing inappropriate tools for marking lines can result in misalignment. Always use tools like chalk lines or laser levels for accuracy.
  2. Irregular Measurements: So often, lines may be measured from arbitrary points rather than fixed measurements, which can lead to discrepancies. Maintain a consistent approach, measuring distances from the same reference point throughout.
  3. Neglecting Visual Inspection: After marking lines, failing to visually inspect them creates a risk of missing misalignments. Always step back regularly to assess your progress and evaluate for straight lines.
  4. Rushing the Process: In the eagerness to finish, rushing through the marking process may lead to missing the chance to achieve desired accuracy. Allow adequate time for careful measurement and correction.
  5. Lack of Guides: Not utilizing string or guide methods to ensure straight lines can lead to a chaotic layout. The use of guides can be invaluable in maintaining shape and symmetry.

Focusing on alignment is analogous to ensuring that roads run true; when lines are straight, clarity increases, leading to greater enjoyment and fair play. Just as a well-laid road allows for smooth travel, correctly aligned lines allow for consistent gameplay.

Conclusion and next steps

Lining a pickleball court may seem like a daunting process, but with the right techniques, tools, and materials, it becomes an engaging endeavor that prepares grounds for countless enjoyable games. By following this guide, you can successfully create a court that not only meets regulatory requirements but also enhances player experience.

Next Steps:

  1. Monitor Line Quality: After completing your work, frequently check the condition of court lines. If they start to fade or peel, schedule time for repairs.
  2. Store Your Tools Properly: Maintain your equipment in good condition for future maintenance or court enhancements.
  3. Encourage Player Feedback: Engage players for their thoughts on the court-lines and overall conditions. Their insights can help guide future efforts.
  4. Plan for Repaints: Establish a schedule for regular maintenance and retouching of the lines and surface to keep up with wear and tear.

By investing the time and effort into marking a pickleball court correctly, you enrich the recreational opportunities in your community. So gather your materials, roll up your sleeves, and embark on the journey to establishing a remarkable pickleball experience!